No speaker selected. Please select a speaker from above to see the options/methods for plugging in and powering up the RCA Theremin.
RCATheremin.com
RCA Theremin Setup for Playing
Please read our Hazard Warning page.
Performance Space Considerations
For playing or demonstrating purposes, set the instrument and speaker up in a room or space that has a minimum of 6 to 8 feet between the instrument and any other moving body in the room. It also helps to keep the instrument at least 2 to 3 feet away from walls that have metal lath, pipes or conduits, metal book cases, file cabinets, and any other dense metal objects. Consider acoustic conditions as well. If playing for an audience, with the performer facing the audience, the ideal speaker placement is behind and above the performer. For personal playing, the speaker can face the player.
Handling Precaution
Note that the theremin is extremely top heavy, as more than 90% of its weight is atop those tall spindly legs. If transporting on a dolly, always have a hand securely on top of the theremin cabinet to keep it from tipping when the dolly wheels encounter a bump or gap in the floor surface. When moving the cabinet from dolly to floor set it down gently and squarely on all four legs to avoid unnecessary strain to the leg joints.
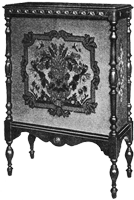
Speaker

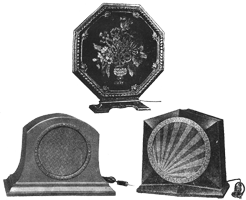
The speaker that was advertised most commonly with the theremin was the RCA 106 Electro-Dynamic Loudspeaker. This was RCA’s top-of-the-line speaker introduced in 1928 to accompany RCA Radiolas. Other 1920s RCA speakers may be used, such as the 100, 100A, 100B, 103, et cetera. Likewise, any high-impedance vintage loudspeaker (± 1200 to 1600 Ω) can generally be used with good results. In some cases, a speaker isolating transformer may be required.
Speaker Cord
Lead the cord from the speaker, up through the hole in the bottom of the theremin cabinet (same hole that the theremin power cord exits through), into the two pin jacks on the back of the power supply on the bottom shelf inside the theremin cabinet. Make sure to tuck the speaker cable down between the SPU and the safety interlock switch housing to prevent the cable from getting pinched when closing the doors.
For safety, the instrument should not be plugged into a power outlet until after the speaker connections are made, as there is a shock potential at the speaker pin jacks under certain conditions, as noted on the hazard warning page.
Select Your Speaker
Select the speaker you will connect to the theremin to determine the next steps.
Powering Up
When Using the RCA 106 Loudspeaker
In addition to connecting the speaker cable, the 106 loudspeaker requires AC power to operate.
Wire Connections: Option 1
This option has the AC power to the theremin provided via the RCA 106 loudspeaker. The benefit of this arrangement is that when the switch on the Loudspeaker is turned off, it keeps the house current entirely out of the RCA Theremin, which has much greater value than the speaker. In the event of an electrical malfunction that has potential for damage, only the speaker is at risk when the equipment remains plugged into the mains. We recommend that all antique equipment be unplugged when not in use.
- From the theremin to the speaker: Pass the AC plug from the theremin down through the hole in the cabinet floor and plug into the round porcelain AC jack at the bottom rear of the speaker cabinet.
- From the speaker to the wall outlet: AC plug on the speaker’s power cord to the electrical mains power.
Power Switch
Note the toggle switch on the right side of the 106 speaker cabinet, just under the top of the cabinet. This switch turns on both the speaker and the theremin at the same time. The lower toggle switch on the theremin should remain on (up), when using the switch on the speaker cabinet for your primary power.
Wire Connections: Option 2
This option has the AC power to the RCA 106 loudspeaker provided via the theremin, and is the method outlined in the original owner's manual. We do not recommend this method unless all AC power wiring inside the theremin cabinet has been inspected and found to be in safe condition.
- From the RCA 106 to the theremin: Pass the AC plug from the speaker, up through the hole in the cabinet floor and plug into the Bakelite AC receptacle on the floor of the theremin cabinet.
- From the theremin to the wall outlet: AC plug on the theremin power cord to the electrical mains power (wall outlet, etc.).
Power Switch
The toggle switch on the 106 loudspeaker, just under the top of the cabinet, should remain on when using the lower toggle switch on the theremin for your primary power. This switch will turn on both the theremin and the speaker at the same time.
When Using a Non-Powered Loudspeaker (RCA 100, 100-A, 100-B, 103, etc.)
When using a non-electrified loudspeaker pass the theremin’s AC power cord down through the hole in the floor of the cabinet and plug directly into the electrical mains. The bottom toggle switch on the cabinet is the main power. Flip this switch up to turn on the instrument.
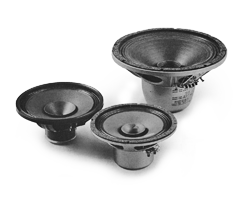
When Using a Modern Speaker
When using a Modern low-impedance speaker, pass the theremin’s AC power cord down through the hole in the floor of the cabinet and plug directly into the electrical mains. The bottom toggle switch on the cabinet is the main power. Flip this switch up to turn on the instrument.
Modern low-impedance speakers (4 or 8 Ω for example) require a matching transformer to properly function with an RCA Theremin and should not be plugged directly into the pin jacks on the SPU.

Pilot Lamp & Audio Confirmation
You'll know the theremin is on by the glow of the red pilot lamp between the knobs. If the pilot lamp doesn't glow, either there's no power to the theremin, a toggle switch may be faulty, or the pilot lamp is loose in its socket or burned out.
You may hear the unit powering up (a momentary rush of a slightly louder hum, immediately fading to a quiet background level). This will be somewhat less noticeable when using a smaller speaker. If the hum is quite loud, it could indicate a problem with the speaker, the theremin or both. Unplug the instrument from the mains and seek professional assistance.
Switches & Controls
Power Switch
The bottom toggle switch (On/Off) on the front of the theremin is the power switch.
Once the wire connections have been made and the instrument has been turned on, it will take about a half-minute before sound is heard. It can take 20 to 30 minutes to stabilize, although the oscillators should be stable enough to play melodically after the first five minutes or so. After the instrument has stabilized, a final adjustment of the pitch control on the front panel will probably be required.
Mute Switch
The top toggle switch (Off/Play) on the front of the theremin is the mute control, and should remain in the down position when not standing directly in front of the instrument, in order to keep it silent when approaching or walking away from it. Flip the switch up for normal playing.
Line Voltage Switch
There's a third toggle switch inside that is not part of the playing adjustments. Refer to the explanation on the Troubleshooting Advice page.
Volume Adjustment

The volume control knob (to the left of the pilot lamp) controls the sensitivity of the volume antenna (how quickly the space-control of volume responds to hand-proximity), and also affects the point in space at which the instrument goes from audible, to quiet and then to silence. The position of this knob affects the total volume to some degree, but it is not intended to be a volume control
in the conventional sense. Primary control of the volume is done in space, by the movement of the hand.
Sensitivity is sharpest when the volume control knob is turned fully clockwise. This will enable the most response to small movements of the volume hand, and will compress the playing arc. Sensitivity is broadest when the knob is turned fully counter-clockwise. In this position, it takes a larger movement of the hand to obtain a response, and the playing arc is tall. Select the position that's best for you and your playing style.
NOTE: Many RCA Theremins will have a quietly audible residual or bleed
tone, even when the hand is at its closest position to the volume loop antenna. The bleed tone is more noticeable with sensitive permanent magnet, voice coil style speakers than with the 106 and other period-correct loudspeakers, which have an inherently lower high-frequency cutoff.
Pitch Adjustment

The pitch control knob (to the right of the pilot lamp) should be set to enable you to access the range of notes (pitch range) that you want to play for a given selection or performance. You will notice an area within the range of the control in which no sound is heard. This is called zero beat
. The control is conventionally set so that the instrument remains at zero beat when your hand is furthest from the antenna (conventionally, up near your right shoulder), and the lowest audible note begins to sound as soon as your pitch hand begins its approach toward the pitch antenna. Other playing styles and stances will require that the lowest note be available further from the pitch antenna, and the knob can set accordingly.
The correct pitch control-knob range for playing is counter-clockwise from zero beat, the more c.c.w., the higher the note. The theremin can however be played with the control clockwise from zero beat, but the playing arc will be reversed, i.e., the notes will go lower as your hand approaches the pitch antenna.
If it's desired to play more in the upper registers, you may adjust the pitch control knob so the lowest note (farthest from the instrument in space) is an octave or so higher than the lowest normally audible note. In this case, drawing the pitch hand completely away from the instrument will not get it to zero beat, and the performer must use his volume hand to silence the instrument. To hold the instrument in silence for longer than a few moments, flip the mute switch down before pulling the volume hand away from the volume loop antenna.
As noted above, the instrument's pitch may drift during the first 20 or 30 minutes, and require readjustment of the control. If zero beat or a normal playing position cannot be found regardless of the pitch knob position, the instrument may require adjustment of the internal service controls (pitch oscillator trimmers). Do not attempt to make these adjustments without proper guidance. Refer to the RCA Theremin Service Notes or other appropriate source, or seek professional help.